How to Move Camera in Blender?
Blender, a powerful 3D computer graphics software, offers a plethora of tools and features to create stunning visuals. One essential aspect of 3D animation and modeling is camera movement, which allows you to control what the viewer sees within your scene. In this article, we will delve into the art of moving the camera in Blender, guiding you through the process and unveiling tips and tricks for creating captivating animations.
Brief Overview of Blender
Blender is an open-source 3D computer graphics application that supports a broad range of animation, rendering, modeling, and compositing features. It’s a versatile tool used by artists, designers, and animators to bring their ideas to life.
https://docs.google.com/document/d/16sKhu4GxRo7LLua0OSyspWuLziw98_inRCUpRj6Q-Fo/edit
Importance of Camera Movement in Blender
Camera movement is a fundamental aspect of 3D animation. It helps in framing scenes, emphasizing specific elements, and guiding the viewer’s perspective. Mastering camera movement in Blender is crucial for creating visually appealing animations. Also, read about Apple Watch How to Charge Apple Watch Without a Charger
Navigating the Blender Interface
Understanding the Workspace
Before diving into camera movement, it’s vital to familiarize yourself with Blender’s interface. Understanding the workspace, including the 3D view, is key to efficient navigation and camera manipulation.
Camera Location and Orientation
Knowing the camera’s location and orientation within your 3D scene is essential for precise camera movements. Blender provides tools to manipulate the camera’s position and angle.
Basics of Camera Movement
Moving the Camera Within the Scene
In Blender, moving the camera within the scene is a fundamental skill. It allows you to control what your audience sees and how they perceive your 3D environment. To move the camera, follow these steps:
Select the Camera: Click on the camera object to select it. You should see the camera highlighted in the 3D view.
Switch to Camera View: Press Numpad 0 or navigate to “View” > “Cameras” > “Active Camera”. This view lets you see through the camera lens.
Move the Camera: To move the camera, use the transformation tools like “G” for grab (move), “R” for rotate, and “S” for scale. You can also use the manipulator handles (arrows) to move the camera in specific directions.
Adjust the View: Use the orbit controls (middle mouse button) to change the view and position of the camera.
Keyframe the Movement: If you want to animate the camera movement, go to the frame where you want the movement to start, move the camera to the desired position, and press I to insert a keyframe for location, rotation, or scale. For more interesting facts visit our website techcrafterhub.com
Rotating the Camera for Different Perspectives
Rotating the camera is crucial to achieving dynamic and engaging visuals. Here’s how you can rotate the camera effectively:
Select the Camera: Start by selecting the camera object in the 3D view.
Switch to Camera View: Press Numpad 0 or navigate to “View” > “Cameras” > “Active Camera” to view the scene through the camera.
Rotate the Camera: Press “R” followed by the axis or axes you want to rotate along (e.g., “X”, “Y”, or “Z”). Alternatively, you can use the rotation manipulator handles to rotate the camera.
Adjust the Angle: Experiment with different angles to find the best perspective for your scene. Use the orbit controls to change the view and angle.
Keyframe the Rotation: If you want to animate the camera rotation, go to the frame where you want the rotation to start, rotate the camera to the desired angle, and press I to insert a rotation keyframe.
Advanced Camera Techniques
Keyframing Camera Movements
Keyframing is a fundamental technique in Blender that allows you to animate the camera smoothly. Here’s how you can use keyframes for advanced camera movements:
Setting Keyframes: Navigate to the frame where you want the camera movement to start. Select the camera, and press I to insert a keyframe. Choose the type of keyframe (location, rotation, scale) based on the movement you want.
Animating the Camera Path: Move to the next frame and adjust the camera’s position, rotation, or scale. Insert another keyframe. Blender will automatically interpolate the camera’s movement between these keyframes.
Refining Animation: To refine the animation, go to the Graph Editor. Here, you can adjust the easing curves of the keyframes to control the speed and flow of the camera’s movement.
Bezier Handles: Use Bezier handles to fine-tune the easing and achieve the desired smoothness in the camera animation. Pulling the handles allows you to control acceleration and deceleration.
Using Constraints for Precise Camera Motion
Constraints are a powerful tool in Blender that allows for precise control over the camera’s motion. Here’s how to utilize constraints for advanced camera animation:
Add a Constraint: Select the camera, go to the Constraints tab, and click “Add Constraint”. Choose the type of constraint that suits your animation requirements.
Configuring the Constraint: Configure the constraint parameters to control the camera’s behavior. For example, you can set the camera to always look at a specific object or follow a particular path.
Keyframing Constraint Influence: If needed, keyframe the influence of the constraint. This allows you to control when the constraint affects the camera’s movement and when it doesn’t.
Experimentation: Experiment with different constraints and settings to achieve the desired camera motion. Constraints offer a high level of precision and control over the animation.
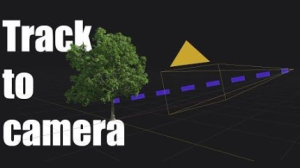
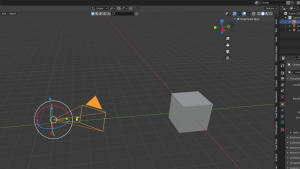
Camera Tracking and Path Animation
Utilizing camera tracking and path animation techniques can add realism and complexity to your camera movements. Here’s how to incorporate these techniques:
Camera Tracking: Set up tracking markers in your scene to track a specific point or object. Attach the camera to this tracking data to create realistic camera movement that follows the tracked object.
Path Animation: Create a curve (e.g., Bezier curve) and use it as a path for the camera. Set the camera to follow this path, and you can adjust the speed and timing to achieve a dynamic camera animation along the chosen path.
Keyframing Along the Path: Keyframe the camera’s position and orientation at various points along the path to control its movement. Adjust the easing and Bezier handles to fine-tune the animation.
Tips and Tricks for Smooth Camera Animation
Focusing on Smooth Transitions
Creating smooth transitions in your camera animation is crucial to achieving a polished and professional look. Here are some tips to ensure smooth transitions:
Easing Curves: Utilize easing curves to control the acceleration and deceleration of the camera movement. Slow starts and stops can make the transitions feel more natural and less abrupt.
Bezier Handles: Adjust the Bezier handles of your keyframes in the Graph Editor. Pulling these handles allows you to fine-tune the speed and flow of the camera movement.
Smooth Interpolation: Ensure that keyframes are set to use a smooth interpolation mode. This prevents sudden changes in direction, resulting in a more fluid motion.
Ease In and Out: Apply an “Ease In” at the beginning and an “Ease Out” at the end of your camera movement. This gradual acceleration and deceleration provide a gentle start and stop, enhancing smoothness.
Utilizing Easing for Natural Camera Movement
Easing is a powerful technique that can significantly improve the overall feel of your camera animation. Here’s how to make the most of it:
Understanding Easing Types: Familiarize yourself with different easing types, such as ease-in, ease-out, ease-in-out, etc. Each type influences the speed of the animation differently.
Customizing Easing: Experiment with custom easing curves in the Graph Editor. Adjust the curves to achieve the desired effect, making the camera movement appear as natural as possible.
Showcasing Your Camera Movement
Rendering and Previewing the Animation
After perfecting your camera movement, render the animation to see how it will look. Previewing the animation helps in identifying areas for improvement.
Fine-Tuning for Perfection
Review the rendered animation, and if needed, fine-tune the camera movements for the best possible outcome.
Conclusion
Mastering camera movement in Blender is an essential skill for creating dynamic and engaging visual content. Understanding the various camera movement techniques, such as tracking, panning, and zooming, allows you to effectively convey your artistic vision. Remember to experiment with different camera angles, speeds, and focal lengths to achieve the desired cinematic effect. With practice and creativity, you’ll unlock the full potential of Blender’s camera tools and bring your projects to life with captivating visuals.
FAQs
- Can I use Blender for other 3D animations besides camera movement?
Yes, Blender is a versatile tool that supports various aspects of 3D animation, including modeling, rigging, and rendering.
- Are there any shortcuts for quick camera movements in Blender?
Absolutely! Blender provides keyboard shortcuts to expedite camera movements, enhancing your workflow and efficiency.
- How can I create a cinematic effect with Blender’s camera?
To achieve a cinematic effect, focus on proper composition, lighting, and camera movement. Experiment with different settings and angles to create the desired mood.
- Can I export Blender animations to other 3D software?
Yes, Blender supports various export formats, allowing you to use your animations in other 3D software for further refinement or integration into different projects.
- Where can I find more resources to enhance my Blender skills?
There are numerous online tutorials, forums, and communities dedicated to Blender. Websites like Blender Artists and Blender Stack Exchange are great places to start.